Building Marble Machine 2
I hadn't actually planned on building a second marble machine, but in March 2000 I had an idea for building a better marble elevating device, plus I had enough time on my hand to actually build a machine using this principle. And this is the machine I built...
What inspired me to play with building a marble machine again was the idea for a marble elevating wheel, which would be very unlikely to jam.
Experimenting with wheels
|
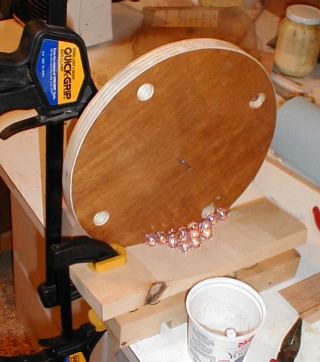
I started experimenting by cutting a circular piece of plywood, and drilling 4 holes into it at
a slight angle. This I temporarily jigged up with some blocks of wood, and started turning it
to see how well it would pick up marbles. The whole thing turned out to work very well.
The wheel I had cut only had a 25 cm diameter, which would not provide enough head (elevation change) to allow the marbles to do much on the way back down. Rather than make a much bigger wheel, I figured I should use a second wheel to elevate the marbles even further. This would be more visually appealing than one big wheel. The challenge with two wheels was how to drive both wheels. At first I wanted to just cut a groove in the circumference of the wheels and use an O-ring style belt to drive them both, but I couldn't figure out where to find that kind of belt. The next idea was to just cut gear teeth into the wheels. This is a lot of work, but more visually appealing than a belt. Visual appeal is very important, as the marble machine, after all, has no real use other than entertainment. |
Making the gears
 I drilled more holes into my initial experiment wheel, and then made a second
wheel of exactly the same diameter. I didn't have another piece of plywood
of the right thickness around, so I used thinner plywood, and then glued some pieces
of wood onto it to bring it to the right thickness.
I made both wheels to have exactly 31 inches circumference, then wrapped a non rigid tape measure
around the edge and put pencil marks every 1/4 inch to divide up the circle
(nowadays, I'd use my gear template generator).
Next I cut out the space between every other set of 1/4" pencil marks with a bandsaw.
I drilled more holes into my initial experiment wheel, and then made a second
wheel of exactly the same diameter. I didn't have another piece of plywood
of the right thickness around, so I used thinner plywood, and then glued some pieces
of wood onto it to bring it to the right thickness.
I made both wheels to have exactly 31 inches circumference, then wrapped a non rigid tape measure
around the edge and put pencil marks every 1/4 inch to divide up the circle
(nowadays, I'd use my gear template generator).
Next I cut out the space between every other set of 1/4" pencil marks with a bandsaw.
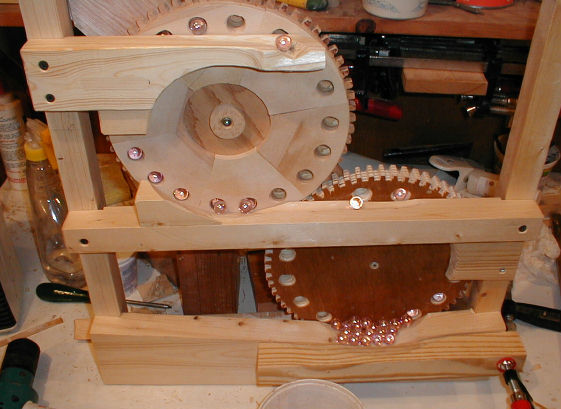
Once I had the two large gears cut and more holes drilled into them, I jigged up everything with some roughly cut pieces of wood to guide the marbles between the wheels. Everything worked nicely.
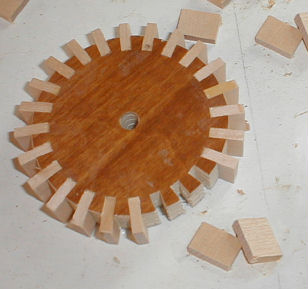
The next thing I needed was an actual drive gear. The drive gear had to be much smaller, and on account of that would be stressed a bit more, so I inset the teeth into the plywood, rather than just using the randomly grained rough plywood edges.
I cut a plywood circle to the minor diameter of the gear. Next I jigged something up to cut the slots on my table saw. The whole jig was mounted on my crosscut gadget, which slides in the T-slot. I used two cheap 7 1/2" skillsaw blades stacked as a poor man's dado blade for this purpose.
Then I cut some hardwood to the exact thickness of the slots, cut it into small squares, and pressed the individual pieces into the slots of the gar. Then I rounded the edges of the teeth a bit with a knife, and my drive gear was complete.
Because the teeth all have the grain pointing outwards along them, I was able to make them thinner without making them too weak. This increases slack in how the drive gear meshes with the main gears but makes it easier to get it to turn without jamming. The inset teeth make for some very cool looking gears. I subsequently built a Gear cutting jig to help index the angles by precise amounts for cutting wood gears. Nowadays, I cut most of my gears out of Baltic birch plywood on a bandsaw, with templates from my gear template generator
Marble tracks for the elevating system
 Shaping the marble guides to allow the marbles to roll into the holes in the wheels took
some optimization. I made the marble guides curved to follow the path of the circle
that the holes follow at the bottom. This gives the marbles more opportunities to
just roll into a hole.
Shaping the marble guides to allow the marbles to roll into the holes in the wheels took
some optimization. I made the marble guides curved to follow the path of the circle
that the holes follow at the bottom. This gives the marbles more opportunities to
just roll into a hole.
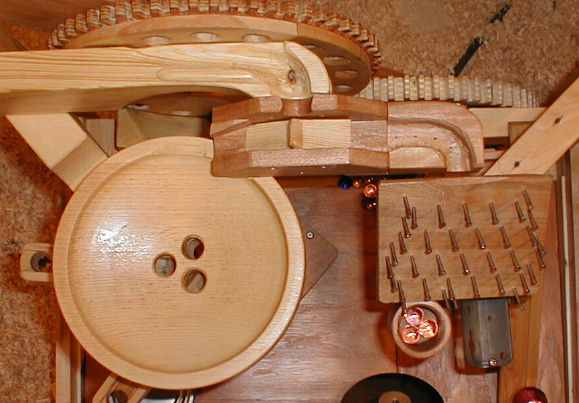
To get the marbles to roll into the holes at the bottom, and out of the holes at the top, I slanted all the holes towards the center. This means once the marbles are more than halfway up, the holes slant slightly down. So it's necessary to block the marbles from rolling out past the halfway point.
With the bottom wheel turning counterclockwise, and the top wheel turning clockwise, the marbles coming out of the bottom wheel are already moving towards the top wheel and neatly slide into the holes in that wheel. With the marbles already moving when they leave the bottom wheel, I didn't need much of a slope in the marble track between the wheels.
The 'spout' at the top of the assembly is to guide the marbles onto descent paths that I had not built yet when the photo was taken.
Randomized descent path distributors
My first marble machine was based on logic. My thinking as I built it had been to invent lots of deterministic marble logic elements, and perhaps to show that it would theoretically be possible to build a marble operated computer.
 The approach to this marble machine was more of one of complete chaos. I had done logic, now I
wanted to try something else. The wheel based elevating system could deliver marbles at
such a high 'clock rate' that it would overwhelm most marble logic elements.
The approach to this marble machine was more of one of complete chaos. I had done logic, now I
wanted to try something else. The wheel based elevating system could deliver marbles at
such a high 'clock rate' that it would overwhelm most marble logic elements.
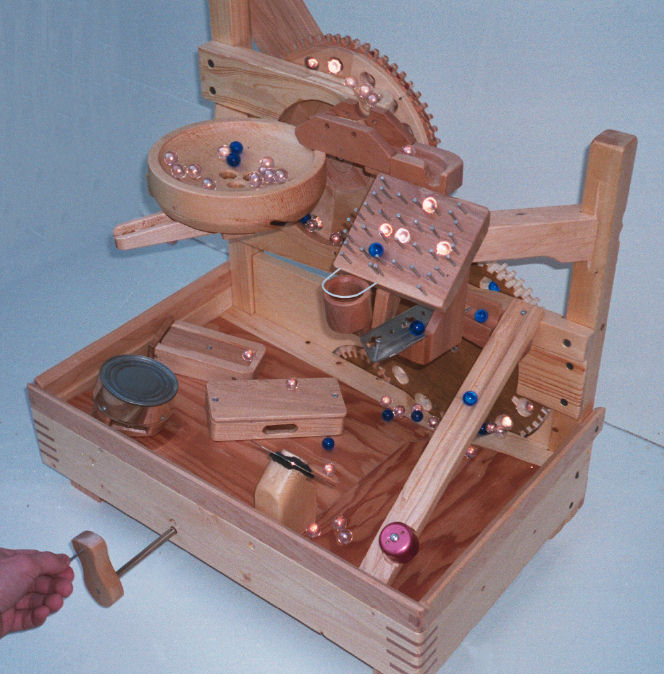
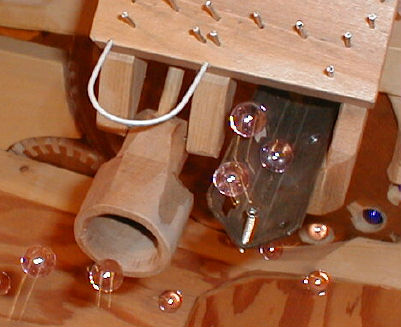
I still used a flipflop to divide the marbles into two streams (see image at left). This flipflop turns out to be a little overwhelmed in that it can't switch as fast as the marbles arrive. Nevertheless, it diverts roughly equal numbers of marbles in either direction, which is all that I really cared about for on this machine.
To the left is a round-ish bowl that the marbles roll round and round in, until they gradually work their way towards the center and randomly enter one of the three holes. The bowl doesn't make much noise, but it does look quite interesting visually especially when there are ten marbles going around it at the same time. When the machine is running at capacity, and one stops cranking, it takes nearly 10 seconds for all the marbles to clear the bowl.
The board of nails on the right allows marbles to bounce randomly against the nails. I wasn't sure if this would create much of a random distribution, but driving some nails into a board and trying it showed that this approach yielded a lot of randomness. The board is mounted at a 45-degree angle, so that gravity pulls the marbles to wards the board, as well as down it, and visibility is optimized.
The percussion section
The bowl on the left distributes the marbles into three paths originating from the three holes. For each of these paths, I created a separate and noisy thing for the marbles to fall on.
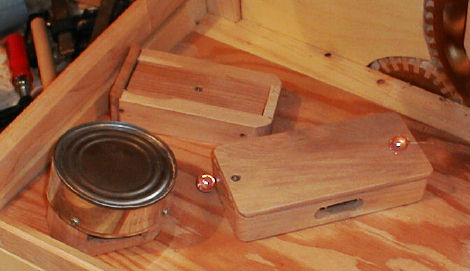 The left most contraption is the bottom of an empty soup can for marbles to bounce
off of. A channel mounted on the bottom of the bowl lets the marbles roll to directly
over this can, and drops vertically. This gadget is the loudest and most distinct noise
of the marble machine.
The left most contraption is the bottom of an empty soup can for marbles to bounce
off of. A channel mounted on the bottom of the bowl lets the marbles roll to directly
over this can, and drops vertically. This gadget is the loudest and most distinct noise
of the marble machine.
Another fun gadget is the gadget towards the back (top of image). Marbles are dropped onto the left of this gadget, and roll towards the right, then stop against the lip of it, staying on the darker piece of wood. The next marble to fall onto the left of the darker piece of wood, causing it to rock and bump the previous marbles several centimeters into the air and off the gadget. The just fallen marble now rolls to the right, ready for the process to repeat. It's not entirely reliable, but even if three marbles end up stuck against the lip, the next marble will dislodge at least two of them, so marbles never bunch up.
The larger block on the right is for percussion. The top of it is a 4mm thick piece of maple, with the rest of the block hollow underneath. Marbles drop from one of the holes in the bowl directly on this, producing a very distinct clack. Also, most of the marbles dropped onto the soup bowl drum will also bounce onto this block, producing a very satisfying ping-tock sequence. Because the ping-tock sequence of marbles bouncing from the soup bowl drum to the percussion block was so satisfying, I slightly rounded the corners of the hole in the bowl that feeds the soup bowl drum. That way, the sop bowl gets a larger share of the marbles.
Dump-O-Matic and clanking metal
I wanted another mechanism that dumps groups of marbles. The divide by 6 in my last marble machine was a neat idea, but would not be able to deal with the asynchronous clock nature of this marble machine. I wanted something that would not jam.

|
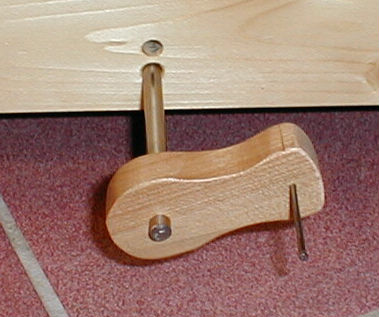
The mechanism works by having a wooden cup on a pivot with a counter weight. This is arranged in such a way that once the cup is full, the cup tips over, and dumps its marbles. The tricky part is balancing it in such a way that the cup, when it dumps, dumps completely, and subsequently rights itself again.
The cup is made of a solid piece of wood. I took a thick hunk of wood, and drilled a big hole to form the inside of the cup. Then I cut away a lot of wood around it, giving it the shape of the cup. It's important to drill the big hole first, because a small piece of wood would not be able to withstand the force of a big 1.5" drill.
The mechanism had the problem that often marbles would just roll along the edge of the cup and then overshoot the edge of the machine, causing unacceptable rates of marble loss. The coat hanger bow (the white U-shaped wire) cured that problem. The mechanism still has the problem that when marbles fall onto it while sometimes cause marbles to fall out of the machine if they fall on it while its in the process of dumping. Higher fences around the edges of the machine would solve this, but that would also reduce visual appeal.
I also had a piece of angle-iron that I noticed made a nice noise when the marbles were dropped onto it. So I used that piece of angle iron as an L-channel to take the rest of the marbles from the nail board. This piece is loosely mounted, allowing it to make more noise. I had to put a screw in the front end of it, as some marbles would roll off the front end instead of rolling towards the back.
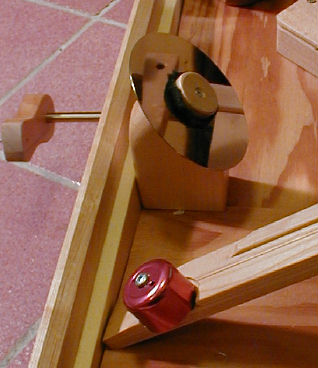
Hard drive gong and bicycle bell
One of the things I really wanted to integrate was a hard disk platter. Unfortunately, modern hard drives don't make as good a gong as the old 5.25" hard drives did, and I didn't have any of the old platters around. Still, the newer platters are much shinier and prettier than the old ferrite coated 5-meg jobs. This hard drive gong in the machine is strategically placed to catch the marbles from the dump-o-matic, and deflect them inwards to the marble machine. This cuts down on marble loss. The platter is mounted in such a way that it's only in contact with felt, and with minimal pressure, as not to dampen the vibrations. It makes a nice 'ting' when the marbles hit it, but I wish it was louder. People keep thinking it's a CD-ROM disk. This first surprised me, because I just assumed everyone had taken apart a hard drive before, but I guess most people just throw out computers when they stop working. Pity. At any rate, CD-ROMs have lousy acoustic properties. They look neat when put in a microwave though. I built a long ramp to deflect marbles from the clanking iron forward again. At the end of the ramp is a small bicycle bell. I wish I'd had a bigger bicycle bell - the one I use isn't loud enough. Still, adds a nice 'ping' when a marble hits it. The bell is placed to bounce the marbles off towards the left so each marble hits it just once and then lets it ring. |
 The dump-o-matic and clanking metal channel didn't use up all the vertical drop I had available,
so I added some more stuff to convert the remaining height (energy) into noises of
various kinds.
The dump-o-matic and clanking metal channel didn't use up all the vertical drop I had available,
so I added some more stuff to convert the remaining height (energy) into noises of
various kinds.
Power source
 Originally I was planning on motorizing this machine, just like Marble Machine 1. Experimenting
with just the big wheels, I realized that with a smaller gear on the drive shaft, it would be just
the right speed for hand cranking. This marble machine is very efficient, so it's fun
to crank and surprisingly easy given how loud the machine is.
Originally I was planning on motorizing this machine, just like Marble Machine 1. Experimenting
with just the big wheels, I realized that with a smaller gear on the drive shaft, it would be just
the right speed for hand cranking. This marble machine is very efficient, so it's fun
to crank and surprisingly easy given how loud the machine is.
Also, a hand crank adds a neat interactive element to the machine. Whenever I show it to people,
they very much enjoy cranking it, and keep on cranking it. Its just so much fun and so fascinating
to watch the chaos of marbles tumbling and falling. It holds kids attention for a long time,
even though it's not that interactive a toy.
The sound of Marble Machine 2. (160k mp3)
|