The story of my home made pipe organ
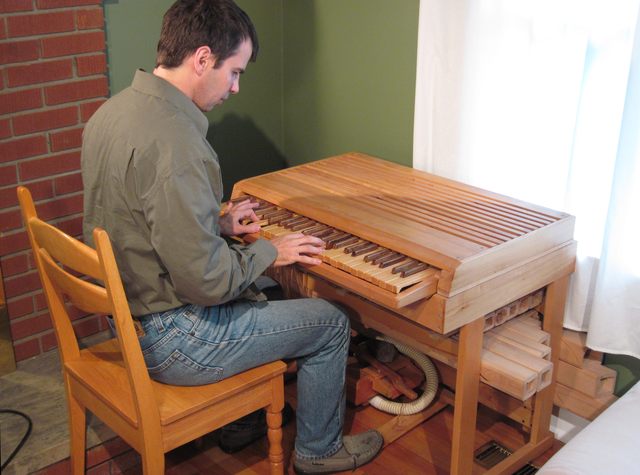
Playing with (not on) my organ
Not so early beginnings
It all began in the fall of 1992, in my final year of university. For lack of a better arts elective to take, I decided to take Music 111. I had absolutely no background in music at the time, and sometimes even had trouble telling whether two consecutive notes were ascending or descending. Nevertheless, I bravely decided to take the course.As the course progressed, I discovered that some of this stuff was actually logical, and also kind of fun. I found myself using the piano room just to play around. I never cared much for attempting to play sheet music, but the idea of hitting keys and getting a sound that was sometimes harmonious was strangely appealing.
With my nonexistent music abilities, and my limited budget, I couldn't justify buying myself a little Casio synthesizer or something like that. The only way I could justify owning a musical instrument was if I actually built it.
I am very fortunate that my dad has a very large and wonderful woodworking shop. When I went home for Christmas that year, I started experimenting with organ pipes. That Christmas was particularly busy for me, as I also built two tables, because the house I was renting with friends was a little bit under-furnished.
Experiments and design
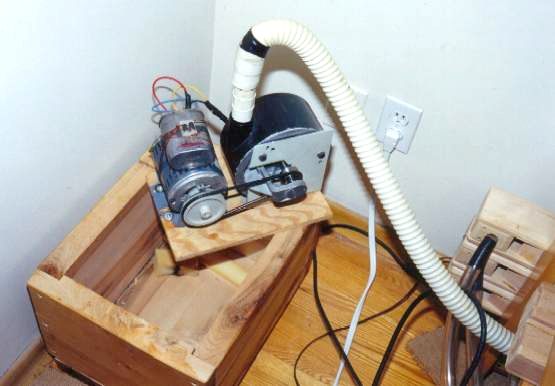
My first organ experiments were high in volume, if not in harmony. I proceeded to build two wooden pipes, and mounted these on top of a box with a vacuum cleaner motor inside
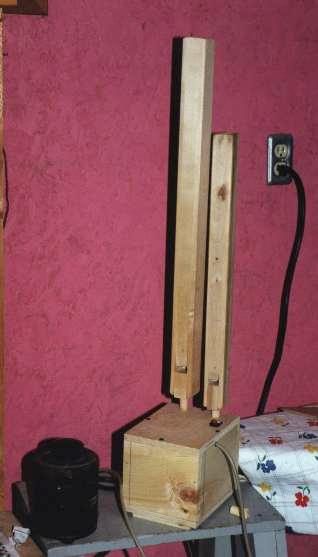 My first organ pipe experiment
From these experiments, a few things became apparent:
|
|
Everybody in my family teased me about even considering building an organ, and to tell the truth, I wasn't so sure at that point either. I did experiment with slowing down the vacuum cleaner motor (the black cylindrical thing to the left of the box is a 1 kilowatt Variac), which helped, but I left it for the time being.
I proceeded to build the two tables I had intended to build over the holidays,
and then to experiment further. I knew I could build pipes to play just about
any reasonable pitch I wanted to, as long as I did not apply too much air pressure.
My next set of experiments revolved around coming up with a simple 'valve box' design that I could build. At the time, I didn't know such a thing in organ terminology is called a 'wind chest'. Another catch was that I did not have a good supply of leather for the 'gaskets' in the valves, so the design I came up with did not use any gaskets.
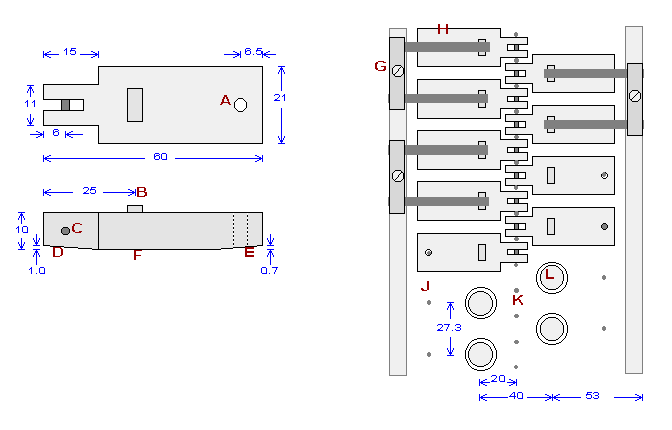
Overall windchest design and dimensions
This drawing shows the cross section of the wind chest design I ended up using.
The drawings came much later though. All dimensions are in millimeters.
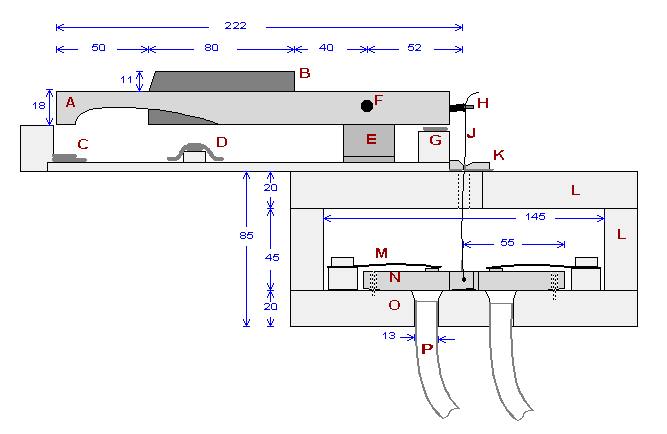 The letter labeled components are as follows:
| A | White key |
|---|---|
| B | Black key |
| C | Felt for white key bottom stop |
| D | Felt for black key bottom stop |
| E | Metal bracket to support shaft every 12 keys |
| F | 1/4" steel shaft for key 'hinge' |
| G | Top stop for keys (only gets hit if are let 'snap' up' |
| H | Nail in back of keys, with steel wire twisted on |
| J | Steel wire |
| K | Small opening with felt padding to pass wire into pressurized wind chest |
| L | Removable portion of wind chest lid |
| M | Steel spring to hold down valve block |
| N | Valve block. Valve block seals against wind chest bottom |
| O | Wind chest bottom |
| P | Plastic hoses leading to pipes |
The valve blocks are all sanded smooth, and so is the bottom of the wind chest.
The leaf springs apply pressure exactly over the center of the hole below, thus
causing for a tight seal of the two flat surfaces. The valve blocks are rounded
slightly towards the back. This gives for a more gradual opening, and
quieter operation (at least that's my theory).
Wind chest cross section with key pressed
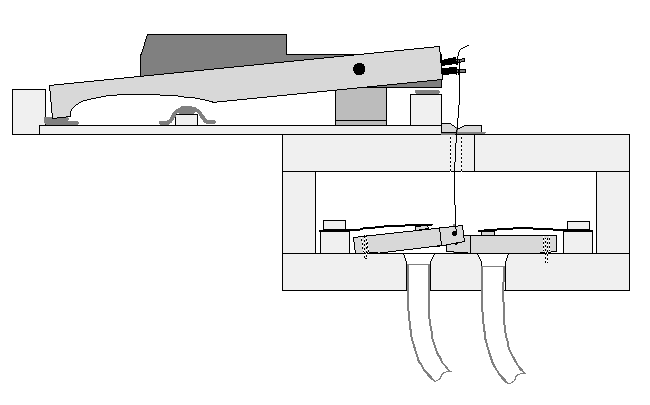 As I chose not to have a complicated linkage between the keys and their
corresponding valves, it was necessary to have the valves at the same
overall spacing as the keys. I accomplished this by breaking the valves
into two rows of whole-tone scales.
As I chose not to have a complicated linkage between the keys and their
corresponding valves, it was necessary to have the valves at the same
overall spacing as the keys. I accomplished this by breaking the valves
into two rows of whole-tone scales.
The pipes themselves are of course much wider, so I used plastic tubing to connect the valves to their corresponding pipes.
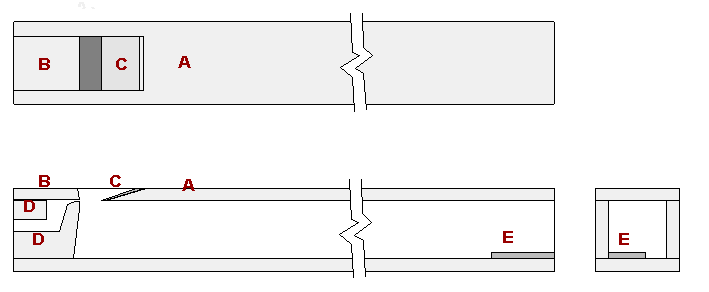
Valve block details
| A | Hole for back alignment pin (nail) |
|---|---|
| B | Block for end of leaf spring to push down |
| C | Pin for attaching steel wire to actuate valve |
| D | Slight bevel at front to ensure good contact on main area |
| E | Slight bevel on back for valve to 'roll' back on. Causes more gradual opening |
| F | Flat main area to seal against wind chest bottom |
| G | Block to clamp two metal springs |
| H | Valve block in place over opening |
| J | Valve block back alignment pin |
| K | Valve block front alignment pin |
| L | Hole in bottom of windchest with plastic tubing |
The original experimental pipes I built were of a difficult design to execute, as the front of the pipe was actually sandwiched between the two sides. This was good for initial experiments, especially when testing the pipes for different configurations before I glued them, but not for making large numbers of them.
The next pipe design I came up with is much easier to build:
Pipe Design
| A | Top of pipe. One piece |
|---|---|
| B | Block to form air gap for air to come put |
| C | Small wooden insert to adjust opening of the mouth (voicing) |
| D | Block at top of organ, cut out for air passage from hose to slot. |
| E | Small wooden block for tuning pitch down if I cut the pipe too short |
This design does have a major weakness in that the block 'B' must be precisely fit into the slot. If it is too narrow, air escapes from the side.
Construction
Using this design, I built about 3 octaves worth of pipes. I varied the geometry as I scaled the pipes, so that long pipes were more slender with respect to their length than the short ones. This produced a louder sound in the higher octaves. I also found out that pipes that are long and slender are much easier to tune, and keep their pitch much better across a wider range of operating pressures and surrounding geometries.
I did run out of time that Christmas holiday, but the result was already playable. I didn't obtain a better air pump than the vacuum cleaner motor. So what I did is put the vacuum cleaner motor into a box, which was surrounded by foam, which was contained in a box of 2" hardwood, which I surrounded by foam, which I put into a cardboard box. With the vacuum cleaner running at about 40 volts to get the right pressure, the noise was tolerable.
I took what I had with me back to University, and set it up in the living room of the house where I lived. Even though we had a modular MOOG and a Jupiter 6 synthesizer set up in our 'studio', my house mate Keith and I ended up playing with that organ an awful lot. 4 months later I had to re-varnish the keyboard. We had worn four layers of varnish straight off the keys!
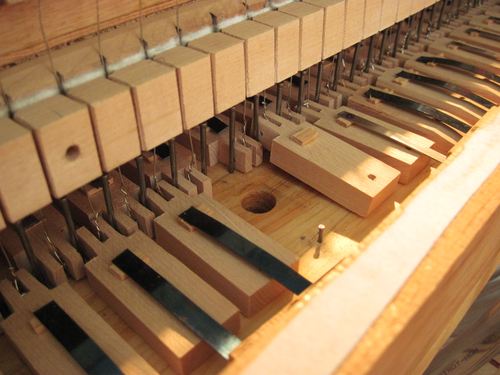
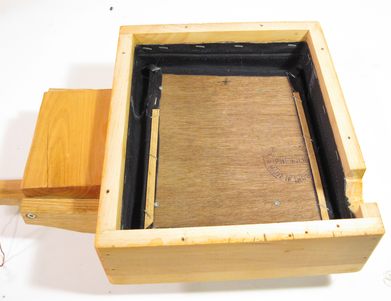
View into the windchest, with one valve block removed
Also, note the yellow spacers between the keys. These are to keep the keys from rubbing against each other directly, and also reduce friction. In the winter, I always need to add some spacers to get the keyboard to feel 'tight', while in the summer, I have to remove them. This is all caused by wood shrinkage and expansion from changes in humidity.
The pipe organ, as set up in early 1993
I hadn't had time to build a stand, so all the pipes were just stacked under the keyboard unit in that first setup. Some were dangling from their plastic hoses, some stacked with wooden blocks between them. This was a terribly precarious arrangement. Every time the stack of pipes was bumped, they shifted slightly, and would alter their tuning. The sound of these pipes is very sensitive to their immediate surroundings, I discovered.
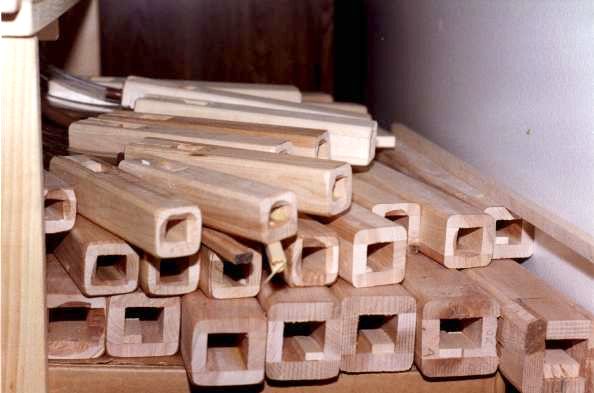
End view of the loosely stacked pipes.
I spent a lot of the next 4 months fine tuning some of the pipes, as well as adding felt under the keys to dampen the noise they made when they hit bottom.
Tuning the pipes without having convenient access to a woodworking shop was also more difficult. They way I had originally tuned them was to tune my Commodore 64 to the pitch the pipe was playing, then work out the frequency I had tuned the computer to, calculate the corresponding reduction in length of the pipe, marked it on the pipe, and then took it to the shop to cut the pipe off on a band saw. This worked for tuning up. For tuning down, I could place a small block of wood in the end of the pipe to reduce the pitch. For minor increases in pitch, I also ended up flaring the end of the pipe with a knife.
I also ended up finally replacing the vacuum cleaner motor with something more elegant. It turns out that running at about 40 volts for extended periods was not good for the vacuum cleaner motor. Carbon deposited between the copper contacts on the commutator, and then conducted electricity and started to smolder. My theory was that the motor's design intended for centrifugal force to clear the carbon dust from the commutator, but at the low speeds at which I was running it, this didn't happen.
The organ pump and motor
This combination I placed in the box I had built of 2" planks. The combination was so quiet that its noise became a total non-issue. At about the same time the real vacuum cleaner we were using in the house died, and I was able to reuse the bearings from that motor to fix our actual vacuum cleaner.
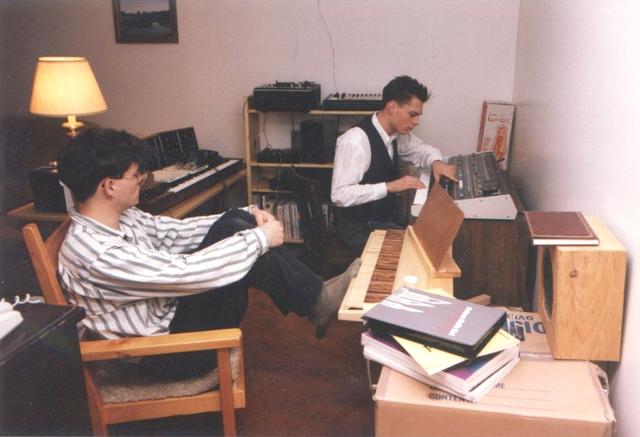
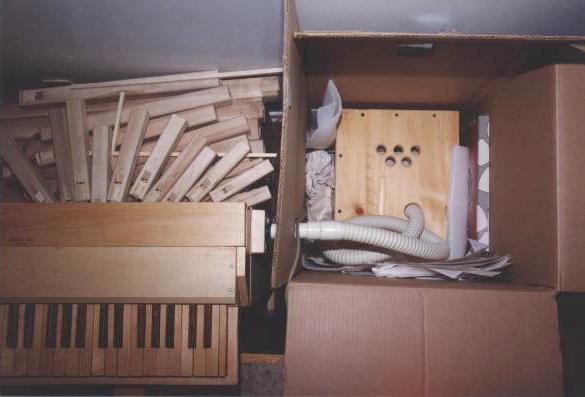
The organ in the 'studio' we had set up
We had quite the studio setup at the time. Bottom right is the pipe organ, behind it the Jupiter 6. To the left is the modular MOOG synthesizer (two VCO's 1 VCF, 2 envelope generators). In the back is one of our reel to reel tape decks, the drum machine, and a DSP sound processor box.
Also note the knife set on the cardboard box in front. I used the knife set for tweaking the wooden pipes, and the cardboard box it is resting on has the vacuum motor blower in it (for extra insulation) If you are wondering, the box in the back IS a box for a lava lamp.
Finishing up the organ
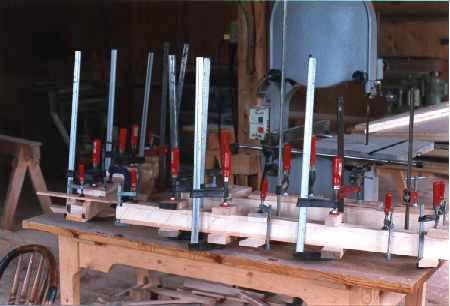 Gluing the 4 ft C, D, and D# pipes
Later that year, after graduating from University, I spent another week
in my dad's shop and finished it up. I had previously not fully 'populated' all
the possible notes of the keyboard. I rebuilt the uppermost half octave
to change the aspect ratio, and extended the range by half an
octave at the top, and three notes at the bottom.
Before this, the organ's bottom octave, and top half octave keys only
made an air escaping type of noise when they were pressed.
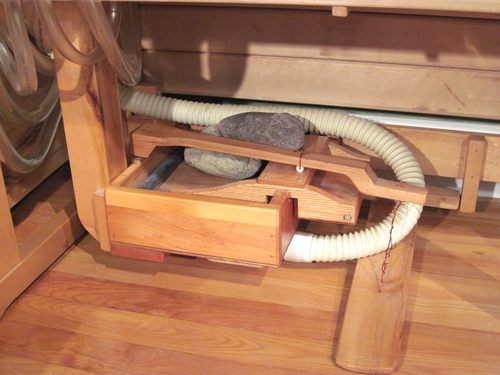 Pressure regulator, with rocks to control pressure and foot pedal
I also built a pressure regulator for the organ. This regulator
consists of a simple bellow, about 20cm x 20cm, but with only 3 cm
of travel. This bellow was not so much intended for a reservoir,
but more as a pressure sensor. When the bellow falls, the valve at the
bottom of the bellow opens further to let more air from the blower in,
thus maintaining the pressure. The
pressure can be varied by piling various amounts of rocks on top of
the bellow, as well as by a special foot pedal which can be used to apply
extra pressure to the bellow for 'expression'.
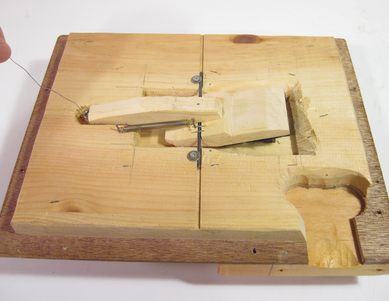
Bellows opened up
I took some photos of the regulator disassembled. The left shot is the valve at the bottom
of the regulator. When the wire at left is pulled up, the assembly pivots to the
right on the shaft, and closes off the air inlet on the bottom of the bellow.
The wire is attached to the bellow. When the bellow has enough pressure in it, it lifts
up the rocks piled on it, and also pulls up on the whire, which closes the valve.
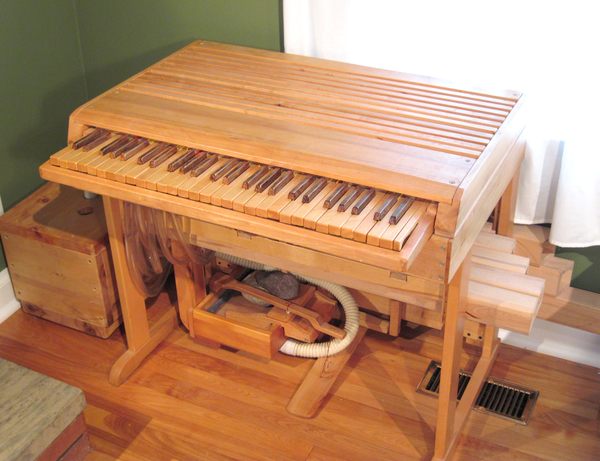
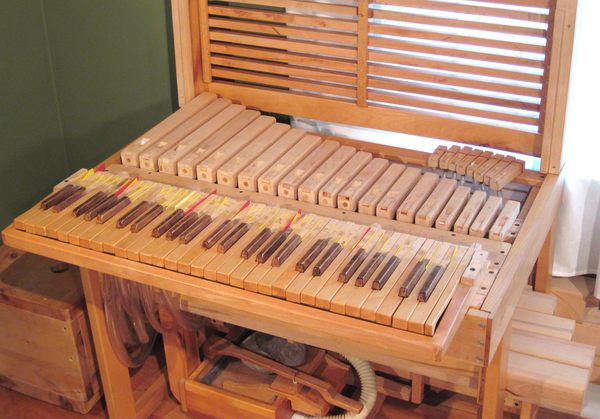 Keyboard and upper two octaves
This picture shows the organ with the top flipped up. This is
not optimal for playing however, as the organ, because I tuned it with
the lid down. Organ pipes are very sensitive to the shape of their immediate
surroundings.
Keyboard and upper two octaves
This picture shows the organ with the top flipped up. This is
not optimal for playing however, as the organ, because I tuned it with
the lid down. Organ pipes are very sensitive to the shape of their immediate
surroundings.
 This is how the organ is set up in my living room today. I only play with
it occasionally, and only when I am certain that I'm alone. Every once in a
while, I have a visitor who is musically talented, so the organ does get some use.
It's also a great conversational piece!
This is how the organ is set up in my living room today. I only play with
it occasionally, and only when I am certain that I'm alone. Every once in a
while, I have a visitor who is musically talented, so the organ does get some use.
It's also a great conversational piece!
More pictures of the organ and its construction
I contemplated building a better organ with multiple registers.
I got as far as making a few drawings on the computer, but then abandoned it.
Here's a few pictures of my preliminary plans for organ 2.
|
A short video opening up the organ and showing how it works. |
Sound and video samples
|
Michael Dunn playing part of Bach #2 prelude in C |
Sound samples A low C-cord sound sample (43 k) A higher C-cord sound sample (38 k) A simple sequence of notes even I can play (63 k) A scale played in 4 octaves at once (124 k) A short sound sample of Allison Wolanski playing an original piece
A catchy little MIDI tune I composed years ago but can't play (1k Midi) |
More on organs and musical instruments
-
The Art of Organ Building
Touring an Organ builder's workshop
Raphi Giangiulio's home made pipe organ - a much more elaborate home made pipe organ than the one I built! He credits my organ for having inspired his.
An Italian Virginal Got a nice e-mail from Mario Giardini, who also built a musical instrument - a "virginal", which is a harpsicord-like predecessor to the piano. Very nice page.
Andy Nelson's organ project Got another email from Andrew Nelsen. He was inspired to build his own organ after reading about mine. It's a small organ, much more precisely done than mine. Nice writeup too.
More pictures of the organ and its construction
Touring an organ building workshop
To my Building a ukulele
To my Woodworking website
To my Home page