Slide photographing jig
Back in 1999, I bought an HP Photosmart S20 scanner, for scanning slides and negatives. I used it a lot, but never scanned in all my slides. The per-slide time that this thing takes is quite long, and it has no form of 'batch' mode. So I never scanned all my slides, but still never ended up pulling out the slide projector, because it was just too much bother.
So I eventually decided having them badly but quickly scanned was better than not at all. I decided to try to just photograph them with a digital camera with macro mode. I figured I'd do a lot, so I built a holder to hold the slides in front of the camera.
The holder is very simple - a thick hardwood board, with two 5/8" blind holes near the front. Two pieces of dowel are loosely placed in the holes. Slots cut into the dowels hold the slide. When using it, I jam pieces of paper along the sides of the holes to hold the dowels in place more firmly.
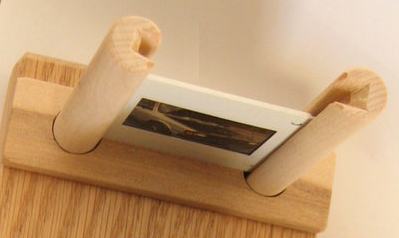
I had to cut the slots extra wide, because some of the self-framed plastic frames I used in Germany are a bit thicker. I also flared out the end of the slot, to make it easier to put slides in there quickly. I also made a few little pieces of wood that I could stack to bring the slide up to the right height, depending on what camera I was using.
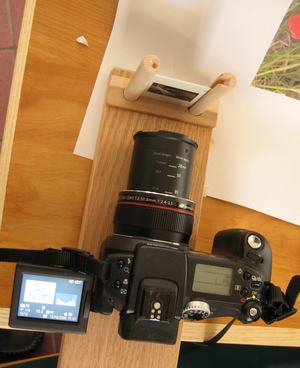
The next step was to place the camera on the board, and figure out what placement gave the best results. I then drilled a hole for a screw to hold the camera in that position by its tripod mount. It turned out for my pro1, even though I could macro in far enough to have the slide fill the whole picture, the edges of the image fall out of focus that far in, so found it best to zoom out a little.
 For illumination, a piece of paper worked out best behind the slide, angled in such a way to reflect light.
Shining the light through the paper doesn't work very well, because normal paper is not evenly transparent.
For illumination, a piece of paper worked out best behind the slide, angled in such a way to reflect light.
Shining the light through the paper doesn't work very well, because normal paper is not evenly transparent.
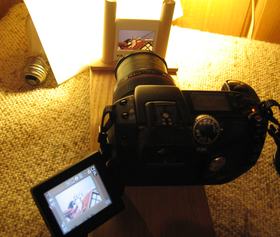
I experimented with different sources of illumination. For some reason, the shadows in my pictures always turned out blue when I used an incandescent light and set the colour balance to tungsten. Compact flourescent worked a little bit better (the above shot is using a CF bulb). But the best results were using just natural sunlight, shining on the paper. For that sort of light, I'd shade the front of the slide, so as to catch as few reflections as possible.
After taking the pictures, I'd still have to crop them down, but XnView is pretty easy to use that way, especially using keyboard shortcuts. I'd save the images with 98% quality. The next step was to batch run them through 'mogrify' from ImageMagick to gamma adjust them 1.5x, and save them at 85% quality. The 1.5x gamma correction cuts down the contrast a bit - the slides already have a fair bit of contrast, and somehow, my Pro1 seemed to add even more contrast.
The results were pretty good actually. The illumination more resembled diffusion illumination, and so cut down on the grain a little bit compared to the sharp condenser type illumination from the Photosmart scanner. Also, towards the center of the image, I was actually getting slightly better resolution than from the Photosmart scanner, and I wasn't even using the camera at full magnification. Of course, slide scanner technology has come a ways since 1999, so a modern slide scanner would probably do a better job.
Other photography stuff on my website:
Back to Matthias Wandel's home page