Home made table saw finger joint jig
This page describes my first box joint jig using a screw to advance the stock.I have since built a more advanced screw advance box joint jig
The joints are always the weakest part of any woodworking projects, so I'm always obsessing over making better joints. Dovetail joints are cool joints, but way too much work to cut by hand, or require a slow and awkward router jig. Accuracy is the key to making good wood joints and I'm quite sure an accurate box joint is much stronger than a typical dovetail joint, provided that both have been properly glued.
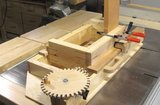
Cutting a box joint |
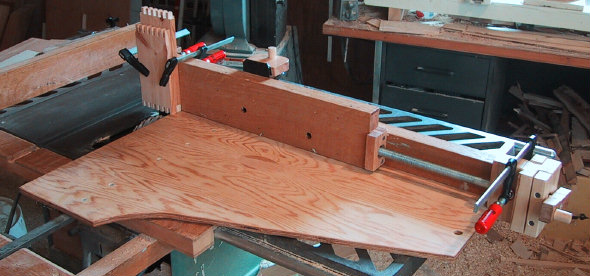
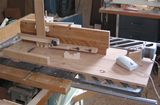
To get around this problem, I built this box jointing jig. This jig is essentially a board that, using a screw advance, can be very precisely moved side to side with respect to the saw blade, allowing cuts with very precise spacing to be made. The whole thing rests on a simple sliding table gadget (sometimes called panel cutter) that slides in the T-slot of my table saw. The sliding table part provides for the movement when I actually cut the workpiece.
I use this in combination with my cheap dado blade substitute to cut slots. However, for this application, even without a proper dado, a set of dado shims is almost a must, as the width of the cut has to be adjustable to about 0.1 mm.
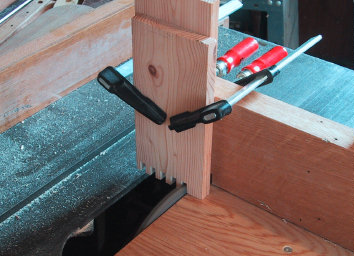
On the far end, the threaded rod, there is a block that holds the rod, and a crank for turning the rod with. I clamp this block to the fence of my table saw sled.
Crank block |
Ball bearing and crank |
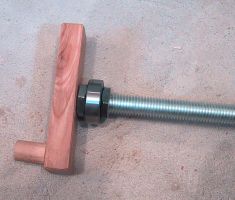
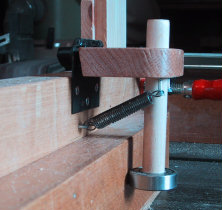
To allow the threaded rod to turn freely, but fix it in the lateral direction, I run the 5/8" threaded rod through a 5/8" ball bearing. The ball is secured to the rod by two nuts on either side of it.
The threaded rod goes through a nut which attached to the end of the board that slides side to side. The nut on the threaded rod has a tiny bit of play in it. Having a bit of play in the system is unavoidable. When I adjust the screw, I always make sure I approach my position from the same direction. The friction in the board sliding side to side will ensure that the play is always going the same way, so its net effect on the overall accuracy cancels out. The spring loaded roller guide ensures that there always is adequate friction so my jig won't wiggle around.
Roller guide |
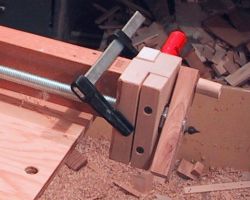
To make sure the board always stays firmly pressed against the fence, I added a spring
loaded roller to push it against the fence. I stuck the bearing on the
end of a 5/8" dowel, put that through a block which is mounted on a hinge (black). The
hinge is a funny offset hinge, with the actual pin relatively high up. This gives the
springs that tension the roller against the fence more mechanical advantage.
|
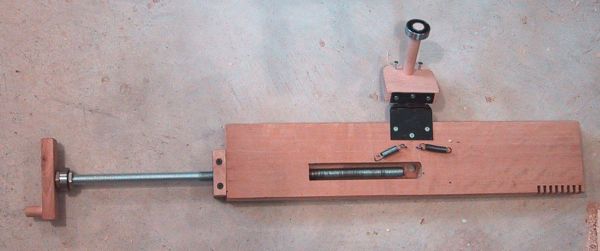
To allow for a large amount of lateral adjustment, the screw needs to be able to go into the board quite a bit. This requires either a very deep hole, or a cutout as shown in the image above. The cutout essentially extends the hole without having a super long drill. Even if you do have a super long drill, if you drill to a depth of 20 cm, you may very well find your drill wandering off to the side, and the hole won't be properly aligned with the threaded rod. Worse yet, with enough error, the drill may break out of the side of the piece of wood.
Also note the notches on the bottom right end of the board. I took this picture after I had just cut my first joint with it. I don't bother trying to align subsequent joints, so the bottom right of the board eventually mostly gets cut away. If I need a solid backing for my workpiece, I can always clamp an extra piece of scrap wood to this board.
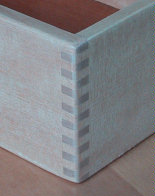
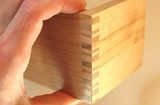
box jointed box corner |
When designing a joint, its best to design it so that the advance between each cut is an exact number of turns on the crank, so you don't need to remember which angle the crank is to face next time. Unfortunately, a 5/8" threaded rod is 11 threads per inch, an odd measure even by awkward imperial units. Because I do anything that needs precision in metric anyway, the units really really don't work out to anything evenly. I usually make joints that involve 4 or 6 turns per cut. With 4 turns per cut, I need two saw blades plus about 0.015" of shim. With 6 turns per cut, I need 3 saw blades and much more shims. Having a good metal vernier or dial caliper is essential when setting up for a joint. I set it up by guessing the shims I need, making a series of cuts, and then measuring the width of the cut slot and the width of the remaining fingers. Divide that difference in half, and you get the thickness of shims that must be added or removed. Then make a test joint to see how it goes together. I always aim for a joint that holds together by friction even before any glue is applied.
Update: I have since built a new screw advance box joint jig that uses some gears between the crank and the threaded rod. By swapping the gears, I can control how far the jig moves with each crank turn.
Chances are, whatever you have sliding in the T-slot of your table saw will also have a bit of play to it as well. To eliminate this source of error, its important to always push your table saw sled exactly the same way every time. Spraying a bit of WD40 into the T-slot before starting makes it go a lot smoother.
Read More about my box joint jig.
 Improved screw advance box joint jig |
 Computer controlled box joint jig |
 More about box joints |
A good page on conventional box joint jigs
To my Woodworking website. or check out my home page