Home built CD changer / duplicator
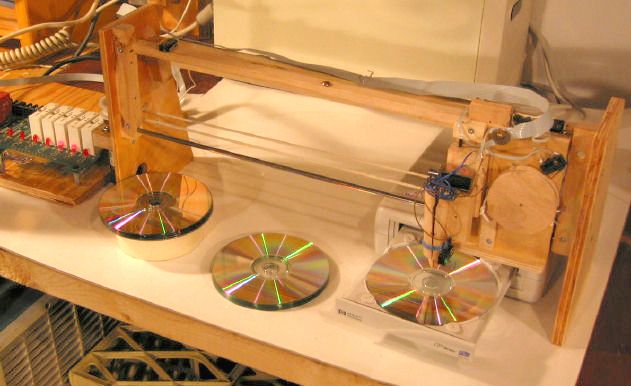
I built this hack back in 2002 for batch burning CDs - such as making a backup of my my digital photo archive, or batch ripping of CDs. The machine is essentially a robot that allows sequencing thru a batch of disks unattended. Its not random access - just has an input and an output stack. Random access would have been more fun, but also more pointless.
The mechanicals
My first thought was to come up with something extremely simple, with no electronics. Ideally, the motion of the cd tray would trip some sort of mechanism that would eject the CD from the tray and insert the next one. After months of thinking, I still hadn't thought of a cd changing mechanism that had a hope of actually working.
 The next
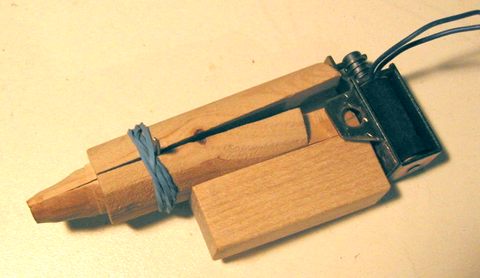
idea was to pick up the CD, but how to pick it up? Vacuum came to
mind, but that would get complicated, vacuum pump, solenoid valves, and all.
Finally I decided to just pick up the CD by the hole, with an expanding
finger, shown at right. The finger's end consists of a cone that inserts
in the CD hold up to the shoulder. The whole finger is cut in half,
and pivoted. The pivot is just to the right of the blue rubber band.
Its a nail, which rests in a grove in either half. The rubber
band is the only thing holding it together. The solenoid on the right
pulls the pieces together on the back, which spreads the front of the
finger, and holds the CD by friction fit. The shape of the cone is
a bit tricky. It has to be made in such a way that it will hold one
CD securely, but never a second. I tweaked the shape of the cone a
bit after taking this photo.
The next
idea was to pick up the CD, but how to pick it up? Vacuum came to
mind, but that would get complicated, vacuum pump, solenoid valves, and all.
Finally I decided to just pick up the CD by the hole, with an expanding
finger, shown at right. The finger's end consists of a cone that inserts
in the CD hold up to the shoulder. The whole finger is cut in half,
and pivoted. The pivot is just to the right of the blue rubber band.
Its a nail, which rests in a grove in either half. The rubber
band is the only thing holding it together. The solenoid on the right
pulls the pieces together on the back, which spreads the front of the
finger, and holds the CD by friction fit. The shape of the cone is
a bit tricky. It has to be made in such a way that it will hold one
CD securely, but never a second. I tweaked the shape of the cone a
bit after taking this photo.
the next challenge was moving the head around. It has to go up and down, as well as side to side. Stepper motors come to mind, but they do require a fair bit of electronics to drive, with 4 separate coils that need to be switched. Plus they need very precise timing, and still need some sort of "home" switch. Thinking about this a bit, I realized that plain old DC motors with a few micro switches for sensing key positions would be sufficient. The horizontal travel only needs to stop in three positions. The vertical travel only needs to go all the way in either direction. By making down travel gravity based, I didn't have to worry about mashing the stack of CDs or the tray with excessive down travel.
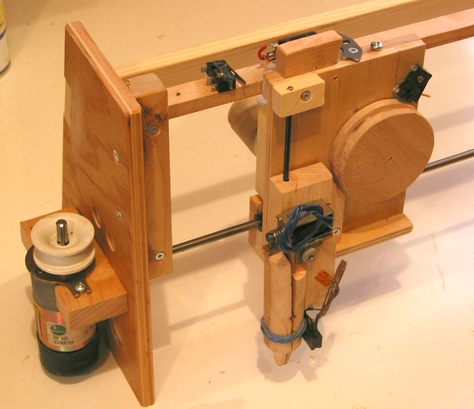 I mounted
the pickup mechanism on a block with a hole thru it. This slides
along a shaft for vertical guidance. The wheel to its right winds
the string to pull the CD pickup mechanism up. Gravity pulls it down.
The pickup, pulley, and gear head motor (hidden) make up the carriage,
which slides on a smooth metal rod from an old Selectric typewriter (one
of the shafts to hold the pinch rollers. The vertical rod also came
from that same typewriter. If you ever get a chance to disassemble
a selectric, do it. Its a fascinating marvel of IBM engineering from
the mechanical adding machine days.
I mounted
the pickup mechanism on a block with a hole thru it. This slides
along a shaft for vertical guidance. The wheel to its right winds
the string to pull the CD pickup mechanism up. Gravity pulls it down.
The pickup, pulley, and gear head motor (hidden) make up the carriage,
which slides on a smooth metal rod from an old Selectric typewriter (one
of the shafts to hold the pinch rollers. The vertical rod also came
from that same typewriter. If you ever get a chance to disassemble
a selectric, do it. Its a fascinating marvel of IBM engineering from
the mechanical adding machine days.
The metal rod, being very smooth, bears the weight of the carriage without
too much friction. The wooden rail along the top is mostly to keep
the carriage from tipping either way, and to hold the limit switches.
The carriage is pulled back and forth by a string which is driven by the
motor on the left. I hadn't installed the string when I took the photo.
The string is wound twice around the drive pulley, which gives more
than enough friction to drive the carriage. And even if it does slip
a bit, its the switches that the carriage hits that determine when to stop.
The Electronics
I was fortunate enough to have a PCB with some solid state relays on it, of the type "ODC-5" from Potter & Brummfield. Solid state relays are essentially an electronic equivalent of a mechanical relay. However, solid state relays only take about 15 miliamperes at 3 volts to drive, and so can be driven directly from digital logic lines or the PC printer port. This saved me from having to wire up a transistor amplifier to drive the relay coils with, like I did in the past.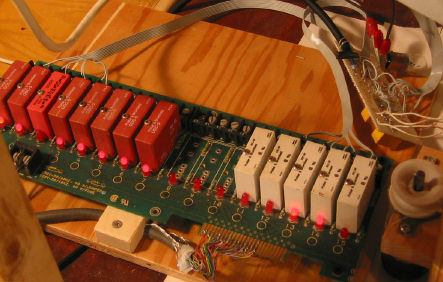 I also had some input relays. I
could have hooked the switches directly to the parallel port, but the
isolating relays gave me some flexibility in terms of schematic, and are
handy for protecting the printer port. Hard to find printer ports
that aren't on the motherboard these days, so I can't afford to blow it up.
I also had some input relays. I
could have hooked the switches directly to the parallel port, but the
isolating relays gave me some flexibility in terms of schematic, and are
handy for protecting the printer port. Hard to find printer ports
that aren't on the motherboard these days, so I can't afford to blow it up.The relays already came on a relay board with a bank of 24 sockets. I didn't need that many, so I cut off the circuit board to just 16 channels. I soldered a cut off printer cable directly to the edge connector. Luckily, the cable manufacturer followed the black - brown - red - yellow - green - blue - violet colour numbering convention, so I didn't have to probe around with the ohmmeter too much to figure out which wire belonged to which pin. The picture shows the board with eight output relays (red) and five input relays (white). The LEDs on the board are a nice touch. I actually ended up using just four output channels and four input channels. The messy wiring board towards the top right of the image is the interconnect to the switches, power supply, and motors. This also includes two mini DPDT mechanical relays (the yellow bricks on the underside). These are used for reversing the motor's polarity.
If you want to build your own setup like this, and don't want to buy solid state relays (they cost about $17 Canadian each), any old bipolar junction transistor (BJT) hooked up directly to the printer port should give you enough gain to drive a mechanical relay with. Don't ask me how to hook up a BJT - get an electronics textbook and learn about transistors.
Horizontal movement schematic
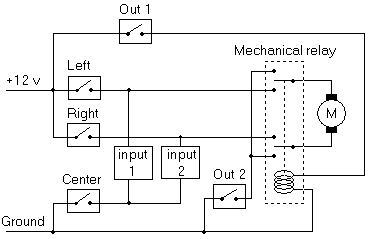 |
Schematic legend
|
Head / vertical schematic
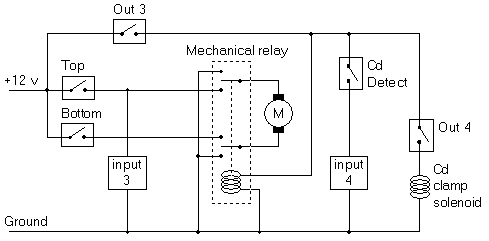 |
Schematic legend
|
The Software
The software for this gadget is relatively simple. I wrote a simple command line driven program that sequences the machine through picking a CD from the tray and dropping it in the middle, and piking up a CD from the stack on the left, and dropping it in the tray. The software also has some manual controls, which I use for debugging and aligning the machine. It does do direct I/O to the printer port. under Linux, this is easy to do if the program runs as root. Under Windows NT/2000/XP, this is much more difficult. But the machine that this is hooked up to runs Linux anyway, so no issue there. Source code: changer.cThe rest is done by cdrecord. cdrecord is a suite of command line driven CD authoring programs. Obviously, the cd recording has to be done from command line, so that it is possible to run it in batch mode from shell scripts. Comes standard with Linux distributions. To my surprise, I found it also runs under Windows, provided that you have an ASPI driver. It even worked with my HP 8200 USB cd burner! So the whole setup could be run under Windows as well, although getting at the printer port is much harder.
I wanted to use this setup with my external HP8200 USB burner with my basement Redhat 7.2 Linux file server / web server box. Experiments my Linux wizard brother Markus had done earlier suggested that this should work. Running with RedHat 7.2, I couldn't get it to work, even after a kernel upgrade. It wouldn't always be usable, even though it showed up under /proc/scsi. And when it was usable, I got kernel panics when I tried to record with it. The machine has too many other tweaks and scripts running on it for me to just upgrade the whole system, so I eventually gave up, took the HP 8200 out of its USB case, and hooked it directly to the IDE cable. That worked. Seeing that I had the machine right in front of the PC, and the ribbon cable was long enough, I could even close the case and not move the machine! I subsequently bought a 4x4x24 "refurbished" CD burner for $50 Canadian from Radio Shack and used that instead.
Now what...
There isn't much that I plan on using this gadget for. I guess mostly its for bragging rights. That, and I hadn't hooked up anything to a PC's printer port in ages. If I wanted to, I could SSH log into it while at work, load a CD in the tray, burn it, and remove it all remotely. Of course, the CD would still be in my basement, so the exercise would be somewhat pointless!
I will probably dismantle it again after a few months. The relay board
just has too many potential other uses. Certainly, I have no hope of
recovering the time I spent building it, because I mostly burn CDs one at
a time. I already ripped all the CDs in my CD collection that I like,
so no point in writing bulk MP3 ripping scripts. I do have a 20 gig collection of digital
photographs, which I back up form time to time.
CD Duplication
|
Video clip of CD changer in action |
For larger batches, you can find plenty of commercial machines. Look for "CD duplicator", because "CD changer" will give you too many references to those 5 CD changer stereo components. For batches of 500+, consider CDs pressed from a master (as opposed to recorded CD/Rs)
Another home made CD changer of similar design, made of legos!
Other related pages on my website: